The attraction of a home server, such as Windows Home Server, is obvious for any household with several computers. But even if you have just one PC, the technology offers significant benefits — such as automatic backups that will let you survive a catastrophic hard drive failure without losing any of your precious data.
Microsoft’s Windows Home Server is built using the same code base as the company’s robust Windows Server 2003, but it’s been streamlined (and somewhat limited) for consumer use. In addition to automatically backing up every Windows XP and Vista computer on your network, WHS can monitor the health of all the Vista PCs on its network. If the server is equipped with two or more drives, it will automatically duplicate all its files to provide data redundancy in case one drive ever fails.
It also allows file and printer sharing; it can stream audio, video and digital photographs to any device that supports Windows Media Connect (including the Xbox 360 gaming console); and it can be configured to allow remote access, so you can access and control your server and all the machines connected to it from anywhere you have an Internet connection.
The recently announced Windows Home Server Power Pack 2 adds important new features to the server operating system — including much-improved support for Windows Media Center Extenders and client PCs running Windows Media Center — and fixes a number of bugs.
Note that Windows Home Server is limited to 10 client computers. Windows, Linux and Macintosh computers can connect to the server (either locally or remotely over the Internet) and access shared files, but only computers running Windows XP and Vista can take advantage of automated backup on home-brew Windows Home Servers.
Several manufacturers currently offer prebuilt servers based on WHS, but you can also buy the operating system by itself and easily build out your own server. We’ll show you how. For the chassis, you can either recycle an otherwise past-its-prime computer or buy a bare-bones system such as the VIA ARTiGO A2000 we’ll use in this example.
Getting a copy of Windows Home Server
Windows Home Server isn’t sold as a retail product, but that doesn’t mean it’s not available to consumers. You can buy a “system builder” copy from many online retailers for about $100. You should be aware that Microsoft does not allow you to reuse this license if you migrate to different hardware down the road.
DIY Home Server Parts List
If you’re handy with a screwdriver and have a little free time, you can save some cash by building your own Windows Home Server machine using an old PC or a new bare-bones system.
Here are the components we used to build our home server:
- VIA ARTiGO A2000 Barebone Storage Server: $300
- 1GB RAM (SO-DIMM): $25
- Two 750GB Seagate 7200.11 hard drives: $80 each
- Windows Home Server OS: $100
- Total cost: $585
By way of comparison, a prebuilt HP MediaSmart Server with 2GB of DDR2 RAM and dual 750GB drives retails for $750.
IT pros and commercial developers can also acquire the software as part of their subscriptions to Microsoft TechNet or Microsoft Developer Network (MSDN).
If you’re not sure you want to commit to Windows Home Server, there are two ways to obtain a trial version of the operating system: You can pay the postage for Microsoft to mail you a DVD, or you can download it for free (in the form of an ISO disc image) and burn it to a DVD using a program such as Nero or CyberLink’s PowerDVD. Visit Microsoft’s Windows Home Server Web site for details.
The trial version will run for 120 days; after that time, you’ll need to purchase the aforementioned system builder disc and perform a server reinstallation (don’t worry, the reinstallation will preserve all your backups).
Installing WHS from a DVD is the easiest method; if the computer you’re using doesn’t have a DVD drive, your next best option is to use an external DVD drive that attaches via USB. Alternatively, you can copy the required files to a USB hard drive or USB flash drive and install WHS from there.
Old PC or new bare-bones system?
The advantage of recycling an old desktop PC for your home server is obvious: You might not need to buy anything other than Windows Home Server. (Although it can be done, we don’t recommend using an old laptop as a server — among other things, the hardware isn’t optimized to run as a server, finding drivers can be difficult, and most laptops have limited storage capacity. Furthermore, Microsoft doesn’t officially support running Windows Home Server on a laptop.)
But setting up something like the ARTiGO A2000 has its advantages, too: It will produce less noise, take up less space and consume much less power than the typical desktop computer. In our tests, the ARTiGO drew between 30 and 35 watts of juice, compared to 180 to 200 watts for a desktop PC.
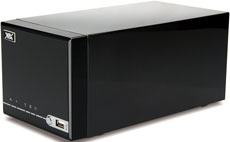
VIA ARTiGO A2000 Barebone Storage Server
The ARTiGO A2000, which sells for $300, consists of a 1.5-GHz VIA C7-D microprocessor, a motherboard with a VIA VX800 core-logic chip set, a Gigabit Ethernet interface, a power supply, and an enclosure with two internal SATA hard drive bays and three external USB ports. You supply the hard drives and memory (the motherboard will accept one SO-DIMM with up to 2GB of DDR2).
The total cost for our project, including the operating system and two 750GB drives, came to $585.
Keep these points in mind whether you build your server using new or repurposed gear:
- Fast, high-capacity hard drives and a Gigabit Ethernet interface will have the most impact on your server’s performance.
- An abundance of memory will increase its performance if you install many add-in programs (you’ll find lots of free utilities that perform all manner of useful functions — and more should be coming now that Microsoft is providing professional developers additional support via MSDN). WHS requires a minimum of 512MB of RAM, but we recommend having at least 1GB.
- And don’t forget to install antivirus software on your server; you’ll need a program that’s designed specifically for server software.
And here’s one last tip before we jump into the how-to section: There is a very good chance that the next version of Windows Home Server, expected to arrive sometime in 2010, will require a 64-bit CPU, which means that a computer with a 32-bit processor — including the ARTiGO A2000 — will probably not be able to run it.
Step 1: Prepare the hardware
The first step to deploying Windows Home Server is to get the server hardware ready.
If you’re recycling an old machine, be sure to save any old files stored on its hard drives, because the installation will completely reformat them. Next, open up the case and use a can of compressed air to blow out any dust bunnies that have taken up residence.
Leave the hard drives installed, but remove any nonessential peripherals, such as a sound card. If the system has a DVD drive, leave it in place because you’ll need it for the installation, but you can remove it afterward because any future software installations will be performed over the network.
If you plan to install Windows Home Server on a bare-bones server, install the memory, hard drives and any other components you’ll need. You’ll also need to temporarily attach a keyboard and a monitor.
In both cases, locate the driver disk containing the device driver for the Ethernet network interface card (NIC) and keep it handy. Plug the machine into a power outlet and connect it to your network with an Ethernet cable. Client PCs can connect to the server through a wireless router, but the server itself cannot operate wirelessly.
Step 2: Adjust the boot settings
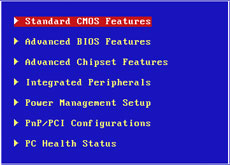
The BIOS screen
Since we’ll be installing a new operating system from either a DVD or an external USB drive, we need to configure the target computer’s BIOS to boot from that drive.
1. Start (or restart) the computer and repeatedly tap the Delete key to access the computer’s BIOS. (This works for most computers; if it doesn’t with yours, try the F1, F2 or F8 key, or check your documentation to find which key to press.)
2. Once you enter the BIOS, open the Boot menu. (If you don’t see this menu displayed at the top of the screen, look for it to be nested in one of the other menus, such as Advanced, or check your operating system documentation.) There might also be two distinct menus: One for selecting a DVD drive as the boot device and another for a USB hard drive.
3. Change the boot device priority list so that the first boot device is either the machine’s DVD drive or a drive connected to its USB port, depending on which you’ll be booting from.
4. Choose the Save & Exit Setup option and allow the machine to reboot.
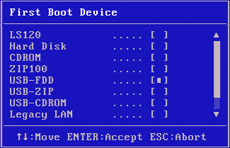
Changing the boot device order
Step 3: Begin the WHS installation
Now it’s time to install the Windows Home Server operating system.
1. If you’ll be booting from a USB drive, plug it in and start the computer; if you’re booting from the DVD drive, just start the computer.
2. As it boots, it should display a message that reads “Windows is loading files. …” If you don’t see that message, if you get an error message, or if the system tries to launch a previously installed operating system, you’ll need to get back into the BIOS and double-check your boot settings. You can’t proceed unless the computer boots from the drive on which the Windows Home Server installation files are stored.
3. In the next step, you’ll set the time and currency format and keyboard type (most people will accept the default values).
4. Click Next, and Windows Home Server will display the hard drives that it has detected.
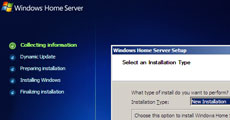
Choosing a new installation
5. Click the Next button again, and Windows Home Server will ask what type of installation you’d like to perform.
6. Choose New Installation, read the warning about erasing all the information on the hard drives in the system — the first of three such warnings — and click Next.
7. Accept the license agreement and click Next.
8. At this point, Windows Home Server will ask that you enter a product key. If you’re installing the trial version, leave this field blank and click Next; otherwise, enter the product key that came with the disc you purchased and click Next.
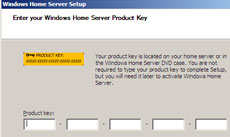
Entering the product key
9. Now you’ll need to give your server a name. You can use up to 15 characters (letters, numbers, and/or hyphens) with no spaces. Click Next when you’re finished.
10. If you’re installing the operating system using a USB hard drive, you’ll see a message instructing you to remove the drive before proceeding. You’ll need the drive connected to complete the installation, but go ahead and unplug it for now and click the OK button.

The third data-deletion warning
11. Windows Home Server will now display a message showing the drives and volumes it has detected. Any data on these drives will be erased in the next step, so place a checkmark next to the message that reads “I acknowledge that data on these drives will be lost” and click Next.
12. You’ll get one more warning about the data on this drive being deleted. Click the Yes button here and the Start button at the prompt that follows.
Windows Home Server will create and format a 20GB system partition on the C:\ drive and then create a second partition for data storage using the balance of the available space on the drive. It will also automatically format any additional drives in your machine; the bigger the drives, the longer this step will take.
You can leave the machine unattended at this point, but if you’re using a USB hard drive to install Windows Home Server, you must reconnect that drive while the first internal drive is being formatted — otherwise, the installation will fail and you’ll have to start over. Windows Home Server won’t touch the external USB hard drive during the formatting process, but it will find it again when it needs to move to the next step in the installation.
Step 4: Finalize your installation
After the drive(s) have been formatted, the setup process begins in earnest, although you won’t have much to do until the operating system automatically restarts (at which point you’ll need to access the BIOS again; more on that in a moment).
1. When you see the Windows Home Server setup message, click the Next button.
2. It’s important that you monitor the progress of the installation and start tapping the Delete key (or whichever key you use to access the BIOS) when the machine reboots. If you don’t access the BIOS and reconfigure it to boot from the internal hard drive, you’ll wind up at the beginning of the installation process again when the computer boots from the USB or DVD drive.
3. In the BIOS, change the boot device priority list (as detailed in Step 2: Adjust the boot settings) so that the first boot device is the internal hard drive.
4. While you’re still in the BIOS, there’s another adjustment to make. Later on, after the entire Windows Home Server installation and setup process is complete, you’ll use other computers on your network to access and control the server. This renders its mouse, keyboard and display unnecessary; you’ll be able to remove them when you’re finished. As we mentioned earlier, you won’t need the optical drive, either.
So, to prevent the machine from hanging when it boots without a keyboard or display attached, go back into the BIOS settings, open the Standard CMOS Settings menu and change the Halt On value to “No Errors.”

Setting the Halt On value to “No Errors.”
5. When you’ve made the necessary changes to the BIOS, save your new settings and restart the machine once more.
6. The next step in the installation process will take an hour or so; you can leave the system unattended while it finishes (the computer will restart several times during this process).
7. In the final step of the installation, you’ll be asked to type an administrator password that you’ll use to access Windows Home Server. Since this will be the gateway to your entire network and every computer connected to it, you should come up with a strong password; Window Home Server requires one that’s at least seven characters long and consists of upper- and lowercase letters, numbers and symbols. You’ll also need a hint that will help you remember the password. When you’re finished, click the right-pointing arrow at the bottom of the screen.
8. At the next screen, choose whether or not you want Windows Home Server to automatically download and install updates; we recommend that you turn this feature on. Make your choice and click the right-pointing arrow at the bottom of the screen.
9. In the next screen, indicate whether or not you wish to join Microsoft’s Customer Experience Improvement Program. Microsoft claims it doesn’t collect any private information using this tool, but sticklers for privacy typically decline this option. You’ll be asked to make a similar choice regarding error reporting on the screen that follows.
10. Your Windows Home Server installation is now complete. But you’ll need to perform at least one more housekeeping step before you can begin using the server: install the driver for the server’s NIC. Copy the appropriate driver to a USB drive and install it from the Windows Home Server desktop. Launch Windows Explorer, locate the installation file and run the executable. You might need to restart the server to complete the driver installation.
11. When you’re finished, you can remove the display, keyboard, mouse and external drive, and run the machine as a “headless” server. If you ever install new software or utilities on the server, you’ll do so remotely.
Step 5: Install WHS Connector on your PCs
To manage your server from a client PC and to enable automated backups for your PCs, install the Windows Home Server Connector software on every Windows PC on your network. (There is no version of the Connector software for Mac or for Linux machines; they connect to the server using the tools in their own operating system.)
If you purchased a packaged copy of Windows Home Server, you’ll find the Connector software on a separate disc. If you downloaded your copy, you’ll find it in both the Windows Home Server folder and your server’s shared software folder.
1. Copy the entire folder to the client PC, double-click the file “whsconnectorinstall.exe,” and follow the instructions.
2. Once you’ve installed the Connector software on a client PC, you can open the Windows Home Server Console from that machine by double-clicking the Windows Home Server icon in the Windows taskbar.
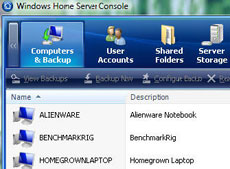
The Windows Home Server Console
3. Enter the Windows Home Server Console administrator password that you created previously, and the console will appear, showing the status of each machine that has the Connector software installed and that has access to the server.
Only one person — whomever you’ve designated to administer the network (probably you) — needs to know the WHS Console password.
Step 6: Set up automatic backups
Next, configure Windows Home Server to automatically back up each of the Windows computers on your network. Once you’ve installed the Connector software on each machine, you can configure all of them from just one PC.
1. Open the Windows Home Server Console, click on Computers & Backup in the top menu bar, right-click on the computer you want to configure and choose Configure Backup from the pop-up menu.
2. When the backup configuration wizard appears, click Next.
3. Windows Home Server will examine the computer and report on the hard drives that it finds. Place a checkmark next to the volumes you’d like backed up and click Next.
4. Windows Home Server will automatically exclude some files (e.g., the contents of the Recycle bin) from the backup. You can add any other files you don’t want backed up by clicking the Add button and browsing through the content on your drives. When you’re finished, click Next and then Done at the next screen. Repeat this step for each of the computers on your network.
5. If you want to control additional details about how and when backups are performed, click the Settings menu (at the top right of the console menu bar) and then click Backup in the window that appears. From within this menu, you can specify a time window during which backups will be performed, manage how long backups are retained and delete old backups (although Windows Home Server will also manage backups automatically). Close the Settings window when you’re finished.
Step 7: Configure users and shared folders
You will also need to establish a user account (with a log-on ID and password) for each person who will connect to the network. You can also create a Guest account, which has no log-on requirement. Only one person at a time may log in as a Guest. If you enable the Guest account, consider restricting it to certain shared folders and limiting even that access to read-only status.
Note: In addition to being limited to serving 10 PCs, Windows Home Server is also limited to 10 user accounts — 11, including the Guest account.
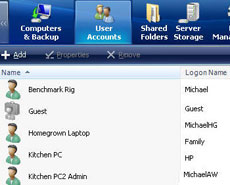
Managing user accounts
1. Click on User Accounts in the top Windows Home Server menu to start the User Account Setup wizard.
2. Decide whether or not you want to activate a Guest account. (Again, if you do so, we recommend limiting the Guest account’s access.)
3. Click the Set Policy button if you wish to change the user password policy from its default value of medium strength (passwords must have at least five characters, but there are no other restrictions). Click OK when you’re finished.
4. To add a user, click the Add button (you’ll find it under the primary menu row). Use the same log-on information to create a Windows Home Server account that the person uses to log on to their regular PC; otherwise, they’ll have to provide a name and password every time they need to access a file on the server.
5. You’ll also need to grant or deny each user remote access (the default choice being to deny it). Granting a user remote access enables them to access shared folders on the server from anywhere they have Internet access, and also to access and remotely control any client PC connected to your Windows Home Server machine — provided that it’s running Windows XP Professional or Windows Vista Business, Enterprise or Ultimate editions.
This feature is not supported by Windows XP Home or by Windows Vista Home Basic or Home Premium editions. You must use a strong password to enable remote access; the privilege cannot be granted to the Guest account.
6. Next, decide which shared folders the user will be able to access on the server. Windows Home Server defaults to granting full read/write access to the user’s own shared folder only (which it will create at the end of this step), but you can change this to grant each user full, read-only or no access to any other users’ folder and to any shared folders (e.g., Music, Photos, Video) located on the server.
Note that Windows Home Server Power Pack 2 greatly improves the way in which Windows Media Center Extenders connect to the home server. Previously, these devices had to rely on a Windows Home Server guest account; now media in shared folders (e.g., Music, Photos, Video) can be streamed directly from the server to the extender.
7. Click Finish when you’ve made your choices. Windows Home Server will establish the permissions and create the user’s shared folder. Click Done when it has finished.
If you ever decide to change a user’s access privileges, click on User Accounts, right-click on the user’s name and click on Properties from the pop-out menu. You can change which shared folders the user can access, change the user’s password, disable the user’s account or remove the user from the system entirely using this same process.
Finally, if you intend to stream media from your Windows Home Server machine, open the Settings menu again and click on Media Sharing in the left-hand column. You can turn sharing on or off for all files stored in the Music, Photos and Videos folders. Be aware that if you enable sharing on these media folders, anyone who has access to your network will be able to access their contents regardless of the individual user-account settings.
Prebuilt Windows Home Server Systems

HP MediaSmart Server
Don’t want to go through the hassle of building your own rig? If you’d prefer to buy a preassembled server, here are a few of the systems available now or coming soon:
HP MediaSmart Server: HP offers two server models: The MediaSmart ex485 and ex487. Both feature 64-bit Intel Celeron processors running at 2.0 GHz, 2GB of DDR2 memory and a Gigabit Ethernet interface. The ex485 ($599.99) is outfitted with a single 750GB hard drive, while the ex487 ($749.99) features two 750GB drives.
Both models have four hard drive bays, four external USB 2.0 ports and one external SATA port. One of the features that set HP’s servers apart from the competition is that they can also automatically back up Macintosh computers.

Shuttle Home Server
Shuttle SH-K4500 and SH-K4800: Shuttle announced two servers at CES in January, but neither machine was shipping at press time. Both machines will be based on Intel’s 64-bit Celeron processor and will be outfitted with 1GB of DDR2 memory, a Gigabit network interface and a single 500GB hard drive.
The model SH-K4500 ($449) will have two internal drive bays and the SH-K4800 ($499) will have three. Both models will have four USB 2.0 ports.
![]()
Velocity Micro NetMagix HQ HomeServer
Velocity Micro NetMagix HQ HomeServer: Velocity Micro is a build-to-order PC manufacturer that allows you to custom-configure your server however you’d like. Its basic NetMagix HQ HomeServer ($899) consists of a dual-core Intel Pentium E2180 processor running at 2.0 GHz, 1GB of DDR2 memory and a Gigabit Ethernet interface.
The system comes with one 500GB hard drive. The chassis has four drive bays, plus four external USB 2.0 ports and two external SATA ports.
No DVD drive? Installing WHS from a USB drive
If the machine on which you wish to run Windows Home Server lacks a DVD-ROM drive and you don’t have a portable DVD drive that connects via USB, you can copy the installation disc to a bootable USB flash or hard drive and use that instead.
You will need to reformat the drive you intend to boot from, so be sure to back up any data from the device before you proceed.
You’ll need a PC running Windows Vista in order to do this with a USB flash drive, and the drive must have least 2GB of capacity. If you have access only to a PC running Windows XP, you’ll need to use a USB hard drive because XP isn’t capable of creating a bootable USB flash drive. (In truth, there are convoluted work-arounds for this limitation, but they are beyond the scope of this article.)
Whichever device and operating system you use, you’ll need administrator access.
1. Click the Start menu, All Programs, Accessories and then right-click on Command Prompt to run the program as an administrator. A black-and-white command prompt window should now appear on your screen.
2. Type diskpart in this window and hit the Enter key. The command prompt should change to
DISKPART>
3. Type disk list at the command prompt and hit the Enter key. A list of all the disks connected to your computer should now appear. Make a note of the number assigned to the disk you wish to reformat. (You can identify the USB drive by its capacity, which will most likely be different from that of your other drives.) We will reformat that drive in the next step, erasing everything on it, so make sure you’ve selected the right drive before proceeding.

Find the drive you want to reformat
In this example, the USB drive we intend to use as a boot disk is identified as Disk 2. When you type the following commands, replace “2” with whatever number is assigned to the drive you’re using.
4. At the DiskPart command prompt, type select disk 2 (again, it’s critical that you use the correct number that’s assigned to your drive) and hit the Enter key. The DiskPart program will respond with the message Disk 2 is now the selected disk.
5. Type clean and hit the Enter key. The DiskPart program will respond with the message DiskPart succeeded in cleaning the disk.
6. Type create partition primary and hit the Enter key. The DiskPart program will respond with the message DiskPart succeeded in creating the specified partition.
7. Type select partition 1 and hit Enter. The DiskPart program will respond with the message Partition 1 is now the selected partition.
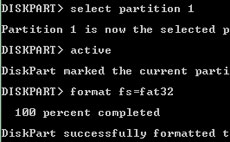
Steps for reformatting the USB drive
8. Type active and hit Enter. The DiskPart program will respond with the message DiskPart marked the current partition as active.
9. Type format fs=fat32 and hit Enter to instruct DiskPart to format the drive using the FAT32 file system. When the program has finished formatting the disk, it will respond with the message 100 percent completed. DiskPart successfully formatted the volume.
10. Type assign and hit Enter to instruct DiskPart to assign a drive letter to your disk. The program will respond with the message DiskPart successfully assigned the drive letter or mount point.
11. That was the last step in the disk-preparation process, so type exit and hit Enter to leave the DiskPart program. You can now close the command prompt window by typing exit and hitting Enter a second time.
12. Now copy the entire contents of the Windows Home Server installation disc to your portable drive. Grab a cup of coffee while this is happening, because it will take 20 to 30 minutes.
13. When it’s finished, plug the USB drive into the machine you want to transform into your server, reboot it from that drive, and install the operating system just as you would from a DVD.
Michael Brown, a freelance journalist living in northern California, has been writing about computers and technology since 1987. He can be reached at [email protected].
Source: Computerworld.com


