Shooting footage with a video camera is easy. Assembling the random footage into something watchable can be a whole other matter. Working with professional-level video editing software such as Adobe Premiere Pro can cost a good deal and also means a very steep learning curve.
If you only want to do occasional editing for YouTube videos, there are some inexpensive applications available, such as Adobe Premiere Elements ($80), Pinnacle Studio HD ($50) and Sony Movie Studio HD ($40). But if you’re really strapped for cash, there are a number of free tools out there that can do the job quite nicely.
For this roundup, I looked at the Windows versions of three free desktop programs (Avidemux, Wax and Windows Live Movie Maker) and at a Web-based editor (JayCut). To test them, I shot footage of some friends at a golf driving range with a relatively low-end, inexpensive camcorder, the Canon ZR800. The ZR800 records in the MiniDV file format, which typically produces a file of approximately 220MB for one minute of video with a resolution of 640-by-480 pixels.
I then edited these clips using the tools that each of the four applications supplied. Rather than trying to create four identical videos, I edited each according to what I perceived were the strengths of the product I was using.
Related stories
Toronto Police go digital to manage mountains of video evidence
Four camcorders for awesome Web video projects
Avidemux 2.5.2
Originally a Linux-only program, Avidemux has been ported to Windows and Mac OS X. This desktop program easily and quickly installed from a self-extracting executable file.
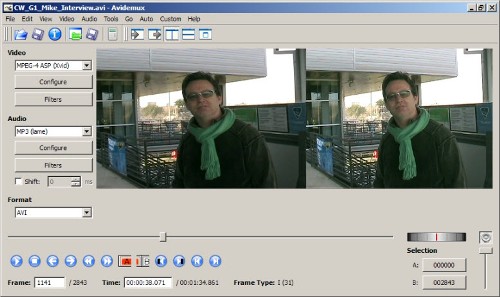
The user interface is pretty much what you’d expect to see in a basic video editor: A timeline that runs along the bottom can be used to move a playback indicator forward and back through your video clip; a window in the upper-right shows you the moment in your clip to which the playback indicator on the timeline is set. The size of this window can be adjusted, and a second window can be added that shows what your footage will look like when a visual adjustment or effect is added to it.
Avidemux does video editing in a strictly linear way. You load your first clip; then you load the next clip, which Avidemux will attach only to the end of the previously loaded clip. You cannot insert a clip somewhere between the beginning and end points of another clip.

*The Avidemux user interface offers a timeline that runs along the bottom.
Reordering the sequence of video is possible, though. Once you load all your clips into the timeline, you can then cut and paste footage segments. You do this by marking the beginning and end of the footage you want to move, cutting or copying it, moving the playback indicator to the point of the timeline to which you want to move the cut sequence, and then pasting it in there.
This isn’t a particularly intuitive way to edit video. Because each clip loaded into Avidemux must be appended to the previous one’s timeline, it’s difficult to experiment with the playback order of your clips. (Professional editing applications such as Apple’s Final Cut Pro or Adobe Premiere Pro allow you to load clips into a storage area and then drag-and-drop them onto a timeline in any playback order you wish.)
Avidemux has several tools to improve and adjust the picture quality of your footage — you can tweak its brightness, contrast and colors, adjust the resolution and sharpen the image. You can get an instant preview of how most of the picture enhancement and adjustment tools will alter the look of your footage, which is very convenient.
You can export your final video to one of several compression formats, including MPEG-4, MPEG-2 and FLV, and there are presets to create a file that will specifically work on one of four mobile devices (the iPhone, iPod, Zune and PlayStation Portable). You can fine-tune the compression settings, but I found it much easier and faster to just use the presets.
Now for the bad news: Avidemux is not very stable. It frequently crashed when I moved the video forward or backward frame-by-frame by pressing the right and left arrow keys — especially after I appended several clips to the timeline.
The program did function well when I used the mouse or on-screen “jog shuttle” knob to go forward or backward. But using the arrow keys is necessary to make precise edits on specific frames of the video. (This problem has been reported to the Avidemux support forum but awaits a solution.)
The bottom line
The good thing about Avidemux is that it gives you a lot of leeway in tuning the image quality of your video. However, its strictly linear method of video editing discourages you from playing around with the sequencing of your footage. Worse, it’s prone to crashing.
Golf video – edited with Avidemux
JayCut is a Web-based application that was founded in February 2007. The Stockholm-based company just launched a revamped site, with improvements and more advanced editing features.
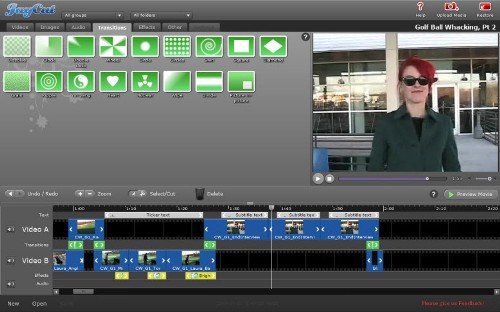
The user interface is presented as a two-video track layout, which is a standard among professional editors like Premiere and Final Cut. As someone who honed his video-editing skills on various versions of Premiere, I immediately took to JayCut. It will feel comfortable to almost anyone who has used one of the more high-end software packages.
One of the advantages of the two-track format is that it helps you to better visualize and manipulate transitions between two shots. You put a video clip in the top track (usually referred to as “A”) and a second clip in the bottom track (“B”). Between these two tracks running along the timeline, there’s a row where you can insert transition settings. The final edited video plays the footage on Track A until it comes upon a transition setting put in the middle track, whereupon the video changes over to the footage of the clip running along Track B.
After I spent nearly an hour uploading my video clips to JayCut’s servers, putting the footage on Tracks A and B of the timeline was a simple drag-and-drop affair. I tested JayCut on the latest versions of Firefox and Chrome, and the app operated quickly, smoothly and stably — almost as if it were a desktop program.
JayCut comes with several transitions that can be easily clicked and dragged onto the timeline. These include the standard dissolves and wipes, and some cheesy ones (such as changing over a shot to another through an expanding heart shape). A standout is the picture-in-picture effect. With it, you can simultaneously show the footage on both Tracks A and B: One appears in a smaller size and is set over the lower-right corner of the other video.
Manipulating and improving the picture quality of your clips is also easy — for example, you can just click and drag the brightness settings onto the timeline. Placing text over video is a cinch and is done using the mouse too. You can make the words scroll over the final footage.

*JayCut’s user interface is presented as a two-video track layout, which is a standard among professional editors.
Because JayCut is a Web-based application that requires you to upload your video files to its servers, you need to consider the size and format of your video files. My Canon camera produces video files in the DV AVI format, which means a typical file would be approximately 220MB for one minute of video with a resolution of 640-by-480 pixels. But if your camera records video into another, more compressed format — MPEG4 would be a common example — the resulting file size will be considerably smaller, since an MPEG4 file can be less than one-tenth that of its DVI AVI equivalent in 640-by-480 resolution. (I converted the footage I shot from DVI AVI to MPEG4 using Super, a free converter program.)
However, the biggest problem is the way JayCut handles previews. Let’s say you want to see how a transition looks going from one video clip to another. Instead of processing just this sequence (that may run for only a few seconds), JayCut insists on processing the entire video — all the clips on the timeline. This can take a lot of time, partly because the resulting video has to be downloaded back to your Web browser and played through JayCut’s playback window. (This video processing and downloading cannot be manipulated by the user separately — both happen automatically in the background once you start a preview-rendering of your video.)
As a result of all this uploading, remote-server processing and downloading, it took me several hours to cut together a finished video that runs only two minutes. (It also took me several hours to work with Avidemux, but in that case, the time was spent cutting, moving and pasting segments of video from one part of the timeline to another.)
I put in several transition effects, overlaid text, trimmed the length of video clips and laid them from shot to shot. Fine-tuning these required a lot of previewing (and thus frequent processing, reprocessing, downloading and redownloading of the video file). So the more bandwidth you have (especially for uploading), the better off you’ll be.
The public release of the new version of JayCut will let you save your edited video to your own computer in the WMV video file format in 640-by-480 resolution. I wasn’t able to test this, since the preview version did not have this feature enabled.
The bottom line
Web-based JayCut looks like a desktop video editor and sports a professional looking UI, but it’s only practical for editing a short video that doesn’t require a lot of cuts or transitions.
Golf video – edited with JayCut
Like Avidemux, Wax is a stand-alone application in the form of an executable that you download and simply click to install. And, like Avidemux, I had no problems installing it.
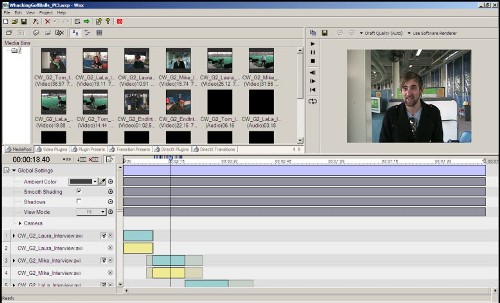
Its user interface is similar to JayCut’s and looks like a professional video editor’s, although navigating through the timeline can quickly become messy. That’s because Wax’s way of editing is … peculiar. Like JayCut, it utilizes more than one track, but Wax allows you to use each track for only one clip. That means that if you want to edit together 20 clips, you’ll need to use 20 tracks.
If you want sound (and why wouldn’t you?), you might need to double that number. Every video clip you import into this program is automatically split into two parts: video and audio. So you need to use two tracks in Wax’s timeline to have synchronized sound with your video.
Wax includes a lot of transitional effects. And I do mean a lot — we’re talking visuals like your video folding into the shape of a cube, spinning and unfolding into the footage of the next clip. Or morphing your image into a bouncing ball. Or into the shape of a house (yes, a house). This desktop video editor has the standard transitions as well (wipes, dissolves, fade-ins and fade-outs, etc.), but it’s the wacky transitional animations that make it interesting.
One picture-quality issue vexed me: Most of the effects would “soften” the original sharpness of the video image. When I created a transition after a clip had run for six seconds, although this changeover ran for only three seconds, the image quality in both clips looked less sharp.
I tried to work around this by applying a transitional effect only to the specific points in time in the two clips where I wanted the changeover to happen. Pulling this feat off required adding even more tracks to the timeline (i.e., each of the two video clips in question required an additional copy of themselves).

*Wax allows you to use each track of your timeline for only one clip.
My results were sometimes glitchy, with transitional effects animating erratically; admittedly, this could have been related to the fact that I didn’t give the effect more than a few seconds to run. Some of the transitional effects ended with a quick but distracting flicker, became inexplicably “stuck” in the midst of animating or failed to work at all.
In the end, I spent several hours cutting together the third chapter of my golf-ball-whacking drama. Most of that time was spent trying to successfully apply transitional effects.
You can render your final video in Adobe’s SWF, the MPEG-1 or the XviD format. I managed to get Wax to successfully create files that worked in these formats. But the extensive options for these compression formats are laid out in a very non-user-friendly manner — as formats within the settings menus — and will probably be bewildering if you’re not already knowledgeable about the intricacies of video compression formats.
The bottom line
If you already use a professional video editor for Windows, Wax could be used as a separate tool for applying unique animated transitions to your video. For everybody else, it’s not suitable for casual editing because of its complexity — and how often do you want to use an effect where your video morphs into a spinning cube?
This is the latest version of Windows Movie Maker, which previously came preinstalled with Windows XP and Vista. Windows Live Movie Maker can now be downloaded for use with Windows 7 and Vista (XP users will have to stick with the older version). Windows Live Movie Maker is part of the Windows Live Suite, which, if it’s not already on your Windows computer, you can download from the Microsoft site.
The most obvious difference between Windows Live Movie Maker and its predecessor is that, for some reason, Microsoft elected to drop the use of a timeline to arrange the order of your video clips.
The older version has a user interface resembling that of a professional video editor — a timeline runs along the bottom, with a playback window previewing your footage on the right.
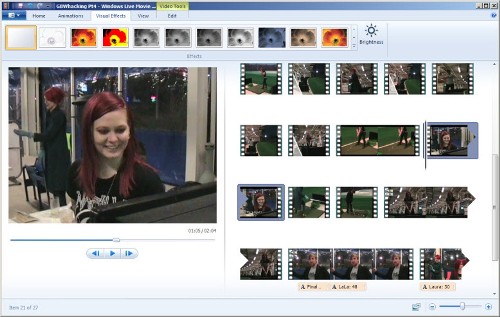
Window Live Movie Maker goes another direction. Instead of using a timeline, it arranges your clips on the right side of the screen as a series of thumbnails, and the playback window is set to the left. The playing order of your clips runs from left to right, and from top to bottom. You can rearrange the sequence of your clips by dragging and dropping their thumbnails.
To edit a clip (i.e., set its start and end points), you double-click on its thumbnail, and the appropriate editing functions under the Edit tab in the toolbar that runs along the top of the interface will be automatically selected by the program so that you know which you can use. (You can also split apart a selected clip, which will create two separate thumbnails.)
Windows Live Movie Maker has effects to improve or alter the image quality of your footage, such as filters that convert your clip into various shades of black and white. There are even some motion effects, including those that make your video throb in a wavy manner as if it were a 1960s psychedelic film.
You’re instantly shown in the playback window what these effects will look like. This preview isn’t a static image but full-motion video running for a few seconds, which is extremely convenient. Effects are applied to a video clip by clicking on its thumbnail and choosing the Visual Effects tab on the toolbar at the top of the user interface.

*Instead of a timeline, Windows Live Movie Maker arranges your clips on the right side of the screen as a series of thumbnails.
A changeover animated effect from one clip to another is applied just as easily. Click on the video clip you want to transition to, and pick your desired transition (diagonal, dissolve, wipe, etc.) from the Animations tab on the toolbar. Windows Live Movie Maker will automatically join the two clips together with the transition.
To add text to your video, you use the text-applying tool to place a bar below your sequence of video clip thumbnails. Then, in the playback window, you type in and edit your text. Effects for your text (such as scrolling or fading in) can be selected from the Text Tools tab, and you’re immediately shown a preview of your text in action.
Your completed video can be saved only in Microsoft’s WMV format, in sizes ranging from 320-by-240 resolution to the largest high-definition format of 1920 by 720. The neatest feature is that Windows Live Movie Maker lets you output directly to YouTube: Enter your username and password, and your finished video will be uploaded to that site. This is how I uploaded Part 4 of my friends’ golf-ball-whacking day to YouTube, and the process went smoothly.
The bottom line
To be honest, I miss the timeline from the original Windows Movie Maker. But if you can get used to this (which might be easier if you don’t already have a preference for editing video on a timeline), then this editor’s strength lies in its easy-to-apply effects, transitions and text. The ability to upload directly to your YouTube account is another plus.
Golf video – edited with Windows Movie Maker
Conclusions
The ideal free video editor for Windows would be a conglomeration of the ones featured in this roundup: the user interface (the timeline and two-video track layout) of JayCut, the image-enhancing tools of Avidemux, the varied selection of transitional and animated effects of Wax, and the instant previewing of video effects of Windows Live Movie Maker.
In the end, I would say Windows Live Movie Maker did the best job. I cut together Part 4 of my friends’ golfing day with it in less than 2 hours, comparably less than I had to spend with the other three free editors. But it’s too bad that Windows Live Movie Maker lacks a timeline and that Windows XP users can’t use it. (They can, however, access the older Windows Movie Maker.)Editing video can be more of a challenge than shooting footage, but this challenge should be on the creative side — not with the editor itself.
Howard Wen is a frequent contributor to Computerworld.
Source: Computer World


