Even if your work is humdrum, your documents shouldn’t be. The latest version of Microsoft Office makes it easier than ever to create handsome documents, thanks to some cool new tools for dressing up text, displaying images, and embedding video.
You don’t have to be a graphics pro to take advantage of these features, and the suite’s Live Preview and Undo commands encourage experimentation by letting you painlessly ditch looks you don’t like. Try these nine uncomplicated features to add a little eye-candy to any document you create.
(Note: You must save your document in an Office XML file format (such as .docx or .xlsx) for the newer features to work.)
Fun With Fonts
Apply Text Effects to your documents (Word, PowerPoint, Excel): In Office 2007, Microsoft introduced WordArt, which let users create text incorporating decorative fonts with effects such as reflections, glows, and outlines. But WordArt text was essentially a type of image; it didn’t behave like text.

Office 2010’s Font group (aka the Home tab) adds a Text Effects button that enables you to apply WordArt effects to text without transforming it into a graphic. You can still edit the text, run a spelling check on it, change the underlying font, and do everything else that you can do with regular text.
To get a set of effects that doesn’t appear in the pop-up Text Effects gallery, click the lower right corner of the Font group to launch the Font dialog box, and then click the Text Effects button at the bottom for a complete set of options.
The WordArt feature in Word and other Office apps still appears in the Insert tab. It creates a text box in which anything you type supports Text Effects. The same effects are available as WordArt in PowerPoint 2010 and in Excel 2010.
Create your own calligraphy (Word, Publisher): Want to give a document an elaborate copperplate handwriting look? Click the lower right corner of the Font group to launch the Font dialog box, and then click the Advanced tab to access settings for custom kerning (spacing between characters), ligatures, and stylistic sets, which create the extended swirls that give some fonts a calligraphic look.
By default, 20 stylistic sets are listed; but not all OpenType fonts have that many different styles, and some fonts change very little in response to the style set you use. You’ll have to experiment to figure out which ones work best. Microsoft recommends trying out style sets with a new font, Gabriola, or with Calibri, Cambria, Constantia, or Corbel–four fonts that were also included in earlier versions of Word.
Some of the OpenType features available in Word 2010 are also available in Publisher 2010.
Quick Pix Tricks

Crop and edit on the fly (Word, Excel, PowerPoint, Outlook): With Office 2010’s robust image-editing tools, you may not need to process your image files in a third-party application before inserting them into your documents. Place your cursor where you want the picture to go, and click the Insert tab and the Picture button in the Illustrations group. Now browse to the picture that you want to use, click it, and click Insert.
This procedure will place the image in your document while simultaneously activating the Picture Tool ribbon, which lets you try out all sorts of effects via Live Preview (simply hover over an effect to see how it will look).

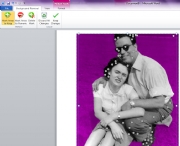
If you’re worried about the exposure or sharpness of an image, click the Correction button to try any of a huge range of exposures and sharpening changes. Click the Cropping button to crop your photo, in place, while graying out the areas you would be cropping; alternatively, you can specify a fixed size or shape. Finally, click the Remove Background button to automatically create a cutout of the main subjects in an image; if this tool doesn’t get the edges right, you can use the buttons in a pop-up ribbon to add or remove areas.
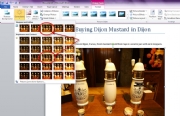
Try an artistic effect (Word, Excel, PowerPoint, Outlook): Bored with a garden-variety photograph? To experiment with artistic effects that will make your photos look more like paintings or drawings, simply click the Artistic Effects button in the Picture Tools ribbon and then hover over the effect you wish to try out. Be prepared to wait a few second to preview some effects, however. To try different intensities and transparencies of effects, select the effect and click the Artistic Effects Options button at the bottom of the preview gallery.
Insert a screenshot in an instant (Word, Excel, PowerPoint, Outlook, Publisher, OneNote): A new feature in Office 2010 lets you insert a screenshot of any open nonminimized window on your desktop with a couple of clicks. In the Insert tab, click the Screenshot button in the Illustrations group to get a pop-up window that shows all open windows. Click the one you want to capture and the screenshot will appear in your document, ready for editing with any of the above-mentioned Picture Tools.
You can even insert part of a screen on the fly. First, minimize your Office app and maximize the screenshot you want to use. Then maximize your Office app again, and click Screenshot in the Illustrations group of the Insert tab, but this time click Screen Clipping at the bottom of the pop-up window. You’ll return to a view of the desktop the way it looked when you last saw it, except that it will be frosted over; now use your cursor to select the area you wish to capture, and it will appear in the document.
New Video Aids for PowerPoint
If you’ve ever used a video clip in a PowerPoint presentation, only to have it vanish when you’ve tried to run the presentation on someone else’s computer, you’ll appreciate PowerPoint 2010’s new video tools. By default, any local video file that you insert is embedded in your presentation, so you don’t have to worry about bundling additional files with your .pptx file.
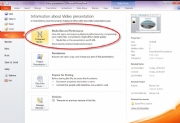
Compress as needed: Of course, embedding video files can dramatically swell the size of your PowerPoint file. To avoid problems associated with out-of-control file growth, you can compress your videos to reduce their size. Click the File tab to access the Backstage View of your presentation; by default, you’ll see the Info page, with ‘Media Size and Performance’ as the top section in the center.
Click the Compress Media button, and you’ll have several options for reducing the file’s size (and video quality). Be sure to play back the compressed file; if you feel that you’ve surrendered too much in quality, you can always revert to a larger file size.

Easily play Web video: If the video you want to use is on a Website, PowerPoint 2010 makes the video easier to play back–if you run your presentation on an Internet-connected PC. Copy the embed code from the site, open the Insert tab on the ribbon, and click the Video button in the Media group on the far right. Then click Video from Web Site in the pop-up menu, and paste in the embed code. (This feature isn’t available in the 64-bit version of Office because Adobe hasn’t created a 64-bit version of Flash to support the video playback.)
Edit video from within PowerPoint: You no longer have to work with video files in a third-party application to prepare them for your presentation. The built-in video editing tools in PowerPoint 2010 let you work on your movies from within the application.
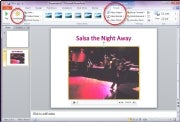
When you insert a video clip into a slide, two new Video Tools ribbon tabs–Format and Playback–will appear. Format has tools (similar to those in the still image-editing ribbon tabs) for adjusting exposure and contrast, for displaying the video within geometric shapes such as stars or circles, and for creating frame effects such as soft edges, glows, and bevels.
The Playback tab is where you can trim your clip (it works on a copy of the video file–the original remains unchanged), add bookmarks so that you can start playback anywhere you wish, add fade-ins and fade-outs, and specify whether to loop a video or rewind it.
Transitions and animations at your fingertips: In PowerPoint 2010, Transitions has a tab of its own, which makes it very easy for you to discover, try out, and apply transitions to your slides. Live preview applies here, too: To see a Live Preview, navigate to a transition you want to try.
New to animations is the Animation Painter, which lets you quickly copy an animation and then apply it to objects in other slides.
Source: PCworld.com


