Microsoft’s Word has always been an impressively powerful piece of software, with dozens, if not hundreds, of features most people never knew existed.
The new “Ribbon” interface in Word 2007 attempts to make some of those features easier to find and use, but there are still a lot of really handy features that you may not even know to look for.
Here are six quick things you can do with Word 2007 that will save you oodles of time. Once you give them a try, you’ll never want to do without them.
(Editor’s note: Some of these tips work in earlier versions of Word. We’ve noted where that’s the case, along with the variations in the steps you’ll need.)
1. Highlight all appearances of a word or phrase in a document.
Traditionally, to find a word or phrase in a Word document, you would hit Ctrl-F (or select Edit –> Find from the pull-down menu), enter your search term and click Find Next to go to the next instance of the word in the document.
From there, you’d continue to click Find Next to search for the next usage, and the next one after that, and rinse and repeat.
In Word 2007, you can run a single search that highlights every instance in the document, making it easy to scan through and find the exact instance of the word or phrase you’re looking for (or to see if you’ve used the phrase far too often).

Choosing Highlight All in the Find dialog
Start a search as you normally would by hitting Ctrl-F and entering your search term. But instead of clicking Find, click on the Reading Highlight button at the bottom of the search window and select Highlight All. Every instance of your search term will be highlighted in whatever highlight color you have selected on your Home tab (yellow by default).

Voila! Your search term is highlighted throughout the document.
To remove the highlighting, simply hit Ctrl-F again to bring up the search window, click the Reading Highlight button and select Clear Highlighting. The highlighting will disappear.
2. Search for a word and all its variations.
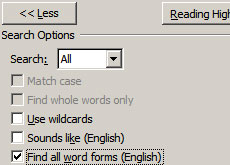
Another powerful feature in Word 2007’s search function is the ability to search for variations on a word, like plurals or verb tenses. (Earlier versions of Word can do this as well.) Click Ctrl-F to open the search form as usual, enter your search word and click the More button at the bottom. Check the box next to “Find all word forms.”

Choosing “Find all word forms” in the Find dialog
When you run the search, Word will locate not only the word you entered, but all its variations. For example, say you want to find every time you describe the sport of running in your document. Enter “run” and Word will locate not just every instance of the word “run,” but also “ran,” “running” and “runs.”
Note that Microsoft’s terminology here is a little misleading. It doesn’t actually find all forms of all words. For example, if you search on “music” and select “Find all word forms,” it won’t find “musical” or “musician.” But if you enter a verb, Word will find all its tenses; if you enter the singular form of a noun, it will find the plural as well; and if you enter an adjective like “good,” it will also find “better” and “best.”
You can even use this trick to find and replace one term with another — “run” with “walk,” “ran” with “walked,” “running” with “walking” and so on. (Rather than choosing Replace All, it’s better to review Word’s suggestions individually to be sure the correct form is used each time.)
Combined with the new Reading Highlight feature in Word 2007, this makes for a powerful editing tool. For instance, most writers try to avoid using the verb “to be” too often in their work, preferring more active and descriptive verbs (e.g., “runs” rather than “is moving quickly”).
Enter “be” as the search term, select “Find all word forms” and click Reading Highlight –> Highlight All. Every use of “is,” “was,” “has been,” “are” and so on will be highlighted, making it easy to pay special attention to them while editing.

The various forms of “to be” are highlighted.
3. Work in two parts of a document at the same time.
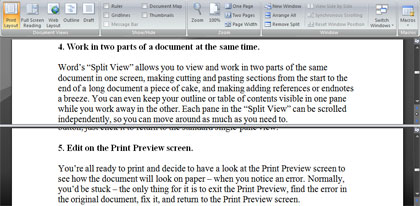
Word’s Split View allows you to view and work in two parts of the same document in one screen. This makes cutting and pasting chunks of text from the start to the end of a long document a breeze; adding references or endnotes is also a piece of cake.
You can even keep your outline or table of contents visible in one pane while you work away in the other. Each pane in the Split View can be scrolled independently, so you can move around as much as you need to.
To activate it in Word 2007, simply go up to the View tab, and in the Window area select Split. (In earlier versions of Word, select Window –> Split.) Your cursor will jump to the middle of the page on top of a horizontal “split line,” and moving your mouse will move the split line up and down. Find a place where you want to split the page and click your mouse to place the line.
Your document will now be viewed through two independent panes, and you can work in either one. If you don’t like where you put the split line, just grab it with your mouse and you can move it around as much as you want.

Look at two separate parts of your document in the same screen with Word’s Split View.
Once you’ve entered Split View, changing back to the default is as simple as repeating the process. Just go up to the View tab and instead of Split, this time you’ll see Remove Split. (In earlier versions of Word, select Window –> Remove Split.) Click that and presto — your screen is back to normal.
4. Make changes in the Print Preview screen.
You’re all ready to print, but first you decide to have a look at the Print Preview screen (select Office button –> Print –> Print Preview or hit Ctrl-Alt-I) to see how the document will appear on paper. That’s when you spot the glaring error you missed. Normally, you’d have to exit out of the Print Preview screen and return to the document, then find the error all over again.
But with Word 2007, you can easily change the behavior of the Print Preview screen so you can edit your document without exiting Print Preview. In the Preview area in the Print Preview ribbon, uncheck the box next to Magnifier. As soon as that’s done, clicking on the document will place your cursor just as it would in the normal editing screen. You can fix a typo, add a word or even rewrite whole paragraphs if you choose.

Uncheck the Magnifier option to edit your document in the Print Preview screen.
Then click Print and send it directly to the printer. You can save your changes here in Print Preview or back in normal view.
5. Give yourself some extra room between paragraphs.
If you’re someone who likes to make notes between paragraphs while you edit or revise a document, or if you want to add new text to a single-spaced outline, give yourself a little extra room to work in by automatically adding a line of space between your paragraphs.
Select the whole document by hitting Ctrl-A, then hit Ctrl-0 and a new empty line will appear after every paragraph. Select All again and hit Ctrl-0 to make the extra lines go away. (This tip works in earlier versions of Word as well, except hitting Ctrl-0 a second time doesn’t remove the extra spaces.)
6. Add random placeholder text.
Sometimes you need to add random text to a document as part of a demonstration or to get a feel for a new layout. The designer’s standby is lorem ipsum, a block of Latin derived from Cicero’s De Finibus Bonorum et Malorum (On the Ends of Good and Evil).
The lorem ipsum text has no meaning for modern readers, which makes it perfect for not being distracted by what the text says, so you can instead focus on what it looks like.
Place your cursor where you want the random text to start and type:
=lorem(x,y)
where x is the number of paragraphs you want to insert and y is the number of sentences each paragraph should contain. When you hit Enter, Word will insert the desired chunk of text. For example, =lorem(1,4) generates this:
Lorem ipsum dolor sit amet, consectetuer adipiscing elit. Maecenas porttitor congue massa. Fusce posuere, magna sed pulvinar ultricies, purus lectus malesuada libero, sit amet commodo magna eros quis urna. Nunc viverra imperdiet enim.
Prefer your dummy text in English? Word 2007 will also insert English text, drawn from a Word 2007 tutorial, by replacing lorem with rand, like this:
=rand(1,4)
(Interestingly, in earlier versions of Word, the =rand function inserts repetitions of the classic typesetter’s dummy sentence, “The quick brown fox jumps over the lazy dog.” The tutorial text that Word 2007 uses is longer and more varied.)
Both =lorem and =rand are handy ways of generating natural-looking text at blazing-fast speed.
I hope these tips save you some time next time you use Word 2007. Some of the features mentioned here were available (in some form or other) in earlier incarnations of the program, but if you didn’t go digging through layers and layers of menus, you’d have never known it. New or old, though, all these functions can be useful to anyone who works with Word.
And there are probably further functions yet to be discovered — I’m still looking for that Write Article button I just know has to be hidden in there somewhere.
Logan Kugler is a Los Angeles-based freelance writer who has written about technology and business for more than 30 national magazines, including MacLife, PC Magazine, Success and Advertising. Age.
Source: Computerworld.com


